
Ever since Conquest: the Last Argument of Kings was published, Para Bellum Wargames spotlighted a two-player starter set featuring an astounding artwork: that portrayed an army of knights facing and clashing against an army of creatures, which were backed by the most fearsome and towering of them all, the Spire Abomination.
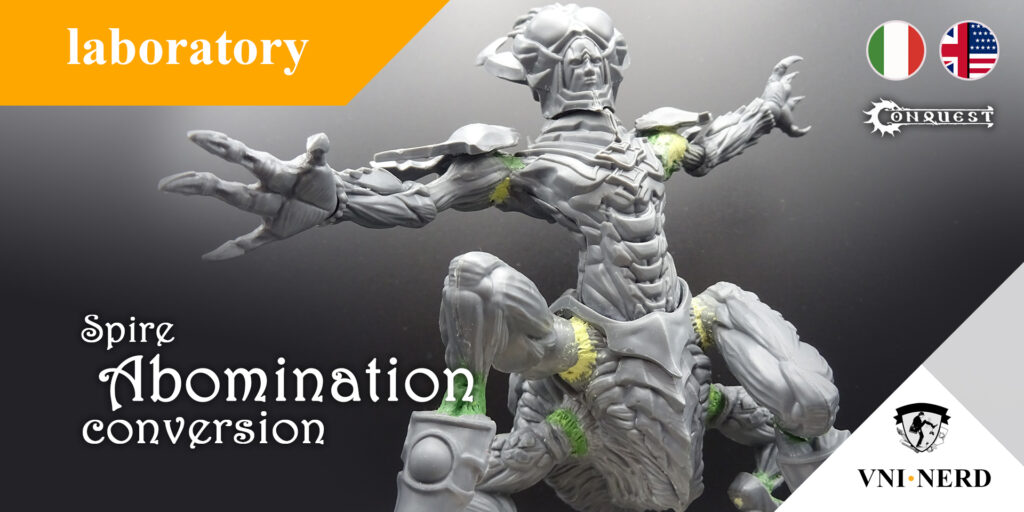
Of course, the iconic monstrosity is included in the box: it is available as a plastic kit (sold separately as well) with an enormous (pun not intended) conversion potential, thanks to its many joints.
After studying this laboratory session, you will be able to acknowledge that the final result can be reached by any hobbyist, independently from the skill level: in fact, this product seems to be a quite perfect occasion to approach many beginner-level operations, such as pinning or sculpting details using green stuff.
Tools and materials
Our nerd-university professionals used a series of products that is usually available on the workbench of any miniature models hobbyist, or that could be easily purchased in any specialized store; additionally, each and every one of those tools and materials will become useful for the majority of hobby projects.
This means that investing in those supplies will provide a utility return quite often and, moreover, most will last many years.
The following products were used:
- cutter, cutting pliers, files and plastic glue for plastics (for steps such as removing parts from sprues, cleaning mould lines and assembling components);
- an hobby hand drill, 2mm metal wire and UHU Patafix Original, or any other temporary fixing putty, which is ideal for keeping pieces in place while taking a decision on the model’s final pose;
- Milliput Standard Yellow-Grey and green stuff, very common epoxy putties that modelers use for any kind of application (in this case, they were clearly used to strengthen and sculpt the Abomination’s joints);
- pvc forex and cork (for the model’s base).
Goal
You should keep in mind your goal, especially the key points which you should base the new creature’s pose on:
- the first idea behind this pose is to simulate the arachnid vibes of the model anatomy, rather than those resembling a centaur, by taking advantage of the many bits included, therefore rear feet should be oriented backwards, just like the original design;
- another element is to have the model trigger a dynamic and menacing feeling, just as it happens when you look at the original artwork “Abomination vs Steel Legion”, that is available in the official Para Bellum Wargames website’s gallery;
- also a boundary is involved, that is to keep the Abomination’s feet glued only on the circular base, so that the model could be played in First Blood (considering the squared stand for sticking out bits, but not for keeping the model standing).
Key steps
The model kit building instructions show that most pieces are sectioned in their length, therefore the first step would be to simply glue those parts together, in order to have the Abomination body parts available.
By doing that, you can start testing the new pose.


In order to reach the aforementioned general goal, our technicians tried to work on body parts featuring smaller articulation angles before anything else, therefore glued abdomen and chest first, then proceeded with rear legs, arms, head and front legs, in this specific order.
Feet were placed last and defined while building the rocks over the base, allowing to pick the perfect fit (pun again not intended) among the many available; the goal was to choose those which provided a stable positioning for the model and showed the Abomination pushing its heavy weight from the ground towards the enemy.


The most substantial difference from the original design revolves around arms and shoulder pads: the latter were removed, internally smoothed and replaced horizontally, in order to allow a wider arms span.
Our professionals had to reduce both shoulders a little, so that they could be placed almost perpendicularly to the body, while Milliput had to be used to fill the gap over which shoulder pads are now placed.


The following gallery allows you to appreciate some steps in the process and the final result captured by different perspectives, other than the key points highlighted in some specific pictures.
Students are welcome to send any question to the Student Administration Office, so that they will be forwarded to specific professionals, based on the required clarifications.

As a reminder, the Spire Abomination model kit can be purchased individually from Minianet Store, which UniNerd is enjoying a social media partnership with, focused on promoting the world of Conquest in Italy.


